vMedia Spectrum Exporter
07/31/2019-
A Manifest Tab has
been added to the Spectrum Exporter.
11/08/2017
- This "new" page was added to the exporter documentation. Deleted
Velocity exporter page.
NOTE: With the
introduction of vMedia’s enhanced Spectrum Exporter, Vertican
Technologies will be phasing out the Class II exporters. We will
continue to support Class II exporters through 2018.
You can use Spectrum Exporter
profiles to create the same export results as the Class II
exporters. Additionally, Spectrum Exporter supports SQL databases
and files stored in their native format, while the Class II
exporters do not.
Overview
The Spectrum Exporter is a universal exporter that supersedes
most of vMedia's previous exporters. It exports all types of files
stored in vMedia individually, or in a ZIP file. You can specify
whether to combine pages, treat them separately, or even convert
them to another format. You can also control which types of
documents get exported based on their type or file extension.
Procedure
Export as Individual Files
- Start vMedia and select the desired database, and open the
Viewing module.
- Search for your desired documents.
- Tag one or more documents for export.
- With this feature the documents can be any type and combination
e.g.:
- .TIF or .PDF documents printed or filed to vMedia
- Documents imported via one of the batch importers
- Microsoft Excel, Word and other types of native files imported
via SendTo vMedia
- Click [Export] from the grid Search Result Action
toolbar.

- Click [Export], then click [Spectrum Exporter]
from the Export menu.
The following dialog will appear:

- You can change the following settings:
- Profile = Select a stored Profile to automatically
populate the various settings.
- Location = Choose "Export to Path, Starting at location"
to export the tagged files. Use the folder icon to browse to a
folder or hand type the desired location. If the target folder does
not exist it will automatically be created during the export.
- Exported Media File Name Expression = The file name
expression can be hand typed, or the File Name Expression Editor can be
used.
- Characters that are not allowed in a file name will be
automatically filtered out during processing.
- Log File = A log file is optional and will be appended
to if it already exists.
- The log file is created if it does not exist.
- It can be shared among users.
- You can also specify Export Options.

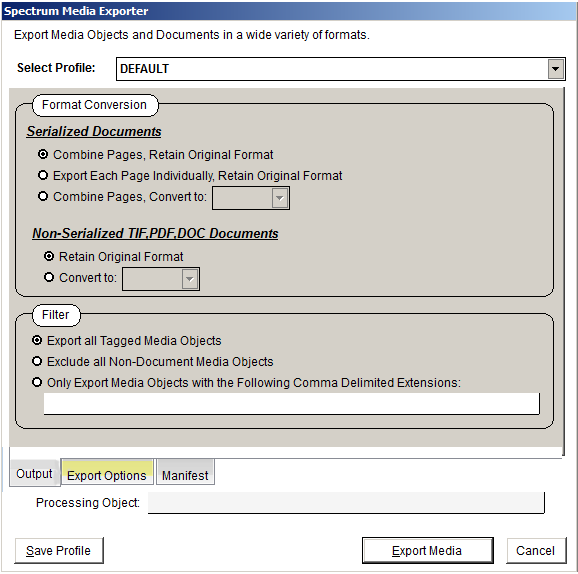
Format Conversion
Serialized documents are created by scanning into vMedia,
printing to vMedia, or filing to vMedia. Serialized documents
consist of a separate file for each page. There are a number of
options for how these documents can be handled during the
export.
- "Combine Pages" outputs a single file in the original
format.
- "Export Each Page Individually" exports a file for each
page of the document. The original format is retained.
- "Combine Pages/Convert" allows you to export a single
file in the selected format.
Non-serialized documents are created by "SendTo vMedia."
There are two options for how these documents can be handled during
the export.
- "Retain Original Format" exports the document in its
native file format.
- "Convert To" exports the document in the selected
format.
Filter
The filter options allow you to exclude certain document
types.
- "Export all Tagged Media Objects" exports all the tagged
files.
- "Exclude all Non-Document Media Objects" excludes all
files except serialized documents and non-serialized TIFF, PDF, and
DOC files.
- "Only Export Media Objects..." only exports files with
the specified file extensions.
- You can specify more than one extension by separating them with
commas e.g. .PDF, .XLS.
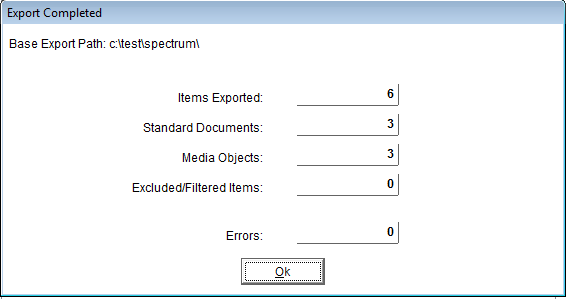
- Click [Export Media] to perform the export. At the
conclusion of the export, a final report summary dialog will be
displayed. (This info is also contained in the log, if
enabled.)

- Click [OK] or press [Enter] to close the export
completed dialog.
Export as ZIP File
- Start vMedia, select your desired database, and open the
Viewing module.
- Search for your desired documents.
- Tag one or more documents for export.
- With this feature the documents can be any type and
combination.
- .TIF or .PDF documents printed or filed to vMedia.
- Documents imported via one of the batch importers.
- Microsoft Excel, Word, and other types of native files imported
via SendTo vMedia.
- Click [Export] from the grid Search Result Action
toolbar.
- Click [Export], then click [Spectrum Exporter]
from the Export menu.

- You can change the following settings:
- Profile = Select a stored Profile to automatically
populate the various settings.
- Location = Click [Export to Compressed (ZIP)
File] to export the tagged files in a single compressed file.
- Use the folder icon to browse to a folder or hand type the
desired location. Select or type the name of the export file to be
created.
- If the target file does not exist, it will automatically be
created during the export.
- An optional password can be added to protect the contents of
the file.
- Exported Media File Name Expression = The file name
expression can be hand typed, or the File Name Expression Editor can be
used.
- Characters that are not allowed in a file name are
automatically filtered out during processing.
- You can also specify Export Options.

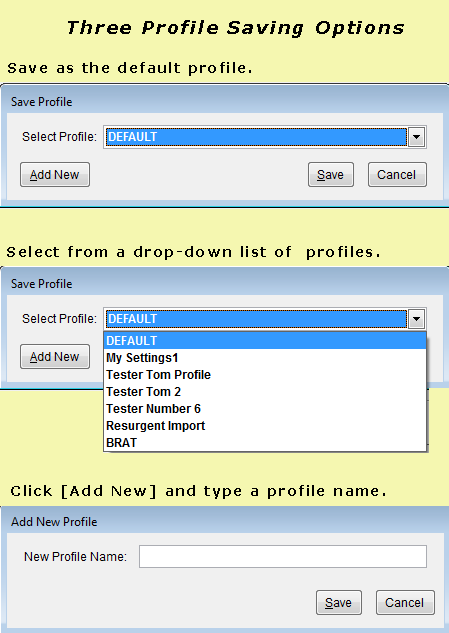
Profile Management
NOTE: Once a profile is selected,
the desired profile will load. Focus remains with the profile
selector after the load.
- Enter a profile in the Select Profile field at the top
of the interface.
Selection Options
- Click on the drop-down button to display a list of profiles and
select your desired profile.
- Type leading characters to select desired item.
- Use [Alt-Down Arrow] to display the drop-down list of
profiles.
- Cycle through the profile options with the the up or down arrow
keys.
- Use any combination of the previous selection options.
- Edit the Location field or accept the default settings.
- [Save Profile] is optional. Click this button if you
want to save the current settings for future use.
- Click [Import Documents].

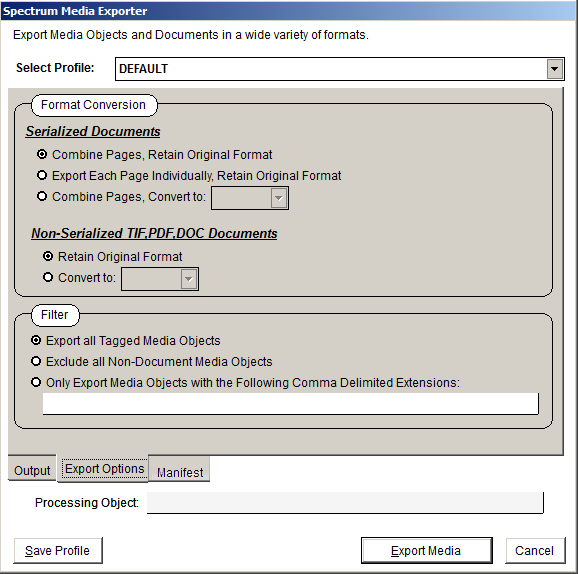
Format Conversion
Serialized documents are created by scanning into vMedia,
printing to vMedia, or filing to vMedia. Serialized documents
consist of a separate file for each page. There are a number of
options for how these documents can be handled during the
export.
- "Combine Pages" outputs a single file in the original
format.
- "Export Each Page Individually" exports a file for each
page of the document.
- The original format is retained.
- "Combine Pages/Convert" allows you to export a single
file in the selected format.
Non-serialized documents are created by "SendTo vMedia."
There are two options for how these documents can be handled during
the export.
- "Retain Original Format" exports the document in its
native file format.
- "Convert To" exports the documents in the selected
format.
Filter
The filter options allow you to exclude certain document
types.
- "Export all Tagged Media Objects" exports all the tagged
files.
- "Exclude all Non-Document Media Objects" excludes all
files except serialized documents and non-serialized TIFF, PDF and
DOC files.
- "Only Export Media Objects..." only exports files with
the specified file extensions.
- You can specify more than one extension by separating them with
commas e.g. .PDF, .XLS.
- Click [Export Media] to perform the export. At the
conclusion of the export, a final report summary dialog will be
displayed. (This information is also contained in the log, if
enabled.)

- Click [OK] or press [Enter] to close the export
completed dialog.
|


