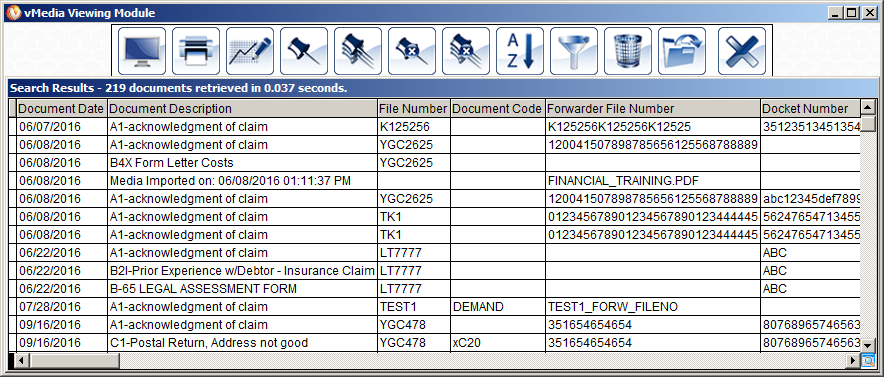
vMedia Viewing Module Search Results
Window
02/14/2018
- Added keyboard shortcuts to the Viewing Module icon
descriptions.
01/17/2018
- Updated screenshot to show new Viewing Module icons.
04/13/2017
- Enhanced the instructions on column sorting, re-ordering, and
width adjustment on the Search / Filter Grid Results page and on
this page.
How to Filter Grid
Results (expanded details)
Search Multiple Scan
Sets Using External Query File
Overview
NOTE: Searches in non-SQL
backend databases are case sensitive; however,
searches in SQL backend databases are not case
sensitive.
The results of a simple database search or an
extended database search appear within the The Search
Results window. It opens to show the scan set or sets that were
found. A Search Result Action window appears below the list
of results. The Tag Command
buttons on the Search Result Action screen also have
keyboard shortcuts.
The Database Search function looks within
the non-blank fields for an exact match of the data, starting with
the left-most character and concluding with the last character
entered as part of the search. This is done independently on a
field-by-field basis. The search is limited to only those fields
which are not blank. The Extended Database Search function
works similarly to the standard database search, except that the
data entered in a field can match the index field anywhere within
the field to be considered valid.
For example, if a record in the database contains
123 Main Street in the address field, an Extended Database
Search will match this record on the search conditions for an
address of "Main" or "Street" as well as "123 Main." Because of the
additional processing involved, the Extended Database Search
takes longer to perform than a standard Database Search.
vMedia searches for the scan set that matches the
index field values that were entered based on the the type you
choose.
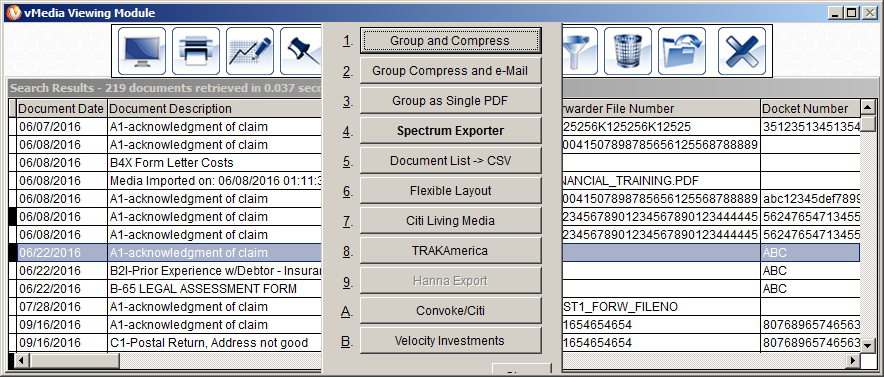
 <V> [View] - Views the selected scan
set or all tagged sets. <V> [View] - Views the selected scan
set or all tagged sets.
 <P> [Print] - Prints the selected scan set or
all tagged sets. <P> [Print] - Prints the selected scan set or
all tagged sets.
NOTE: The Tag command
buttons are used to select multiple scan sets for viewing or
printing. When a scan set is "tagged," a small bar is displayed to
the left of the scan set in the Search Results window.
 <T> [Tag] - Adds the selected scan set
to the group of tagged sets. A small marker will be placed next to
the selected scan set (See next graphic). <T> [Tag] - Adds the selected scan set
to the group of tagged sets. A small marker will be placed next to
the selected scan set (See next graphic).
 <CTRL> <T> [Tag All] -
Place a tag marker on all displayed scan sets. <CTRL> <T> [Tag All] -
Place a tag marker on all displayed scan sets.
 <F> [Filters] - Can filter, sort,
add, or delete grid templates. <F> [Filters] - Can filter, sort,
add, or delete grid templates.
 <S> [Sort] -
Can be sorted by any combination of index fields. In addition, the
initial sort order can be defined in the configuration for each
database. <S> [Sort] -
Can be sorted by any combination of index fields. In addition, the
initial sort order can be defined in the configuration for each
database.
 <U> [Untag] - Removes the tag
marker from the selected scan set. <U> [Untag] - Removes the tag
marker from the selected scan set.
 <CTRL> <U> [Untag
All] - Removes the tag markers from all marked scan sets. <CTRL> <U> [Untag
All] - Removes the tag markers from all marked scan sets.
 <D> [Delete] - Deletes the
selected tag set. The corresponding pages are deleted from the hard
drive immediately; however, the actual database records cannot be
purged while multiple people are using the software. <D> [Delete] - Deletes the
selected tag set. The corresponding pages are deleted from the hard
drive immediately; however, the actual database records cannot be
purged while multiple people are using the software.
 <E> [Edit
Index Entry] - Changes the index field values (the filing
information) of the selected scan set. <E> [Edit
Index Entry] - Changes the index field values (the filing
information) of the selected scan set.
 <ESC> [Close] - Returns to the Data
Entry window to perform another search or exits from the
Viewing Module. <ESC> [Close] - Returns to the Data
Entry window to perform another search or exits from the
Viewing Module.
 <X> [Export] - Provides access to
the list of Class 1
Exporters. <X> [Export] - Provides access to
the list of Class 1
Exporters.
Keyboard Sequences for the Viewing Module
When the Viewing Module is started, the Data Entry
window will have a blue title bar and the cursor will be in the
first index field.
- Fill in the required index fields. It is a good idea to specify
only the minimum amount of information required to locate the
desired document. You can use the [Enter], [Tab], or
[Down Arrow] keys to move to subsequent fields within the
data entry window. To move to a previous field, use [Shift]
+ [Tab] or the [Up Arrow] keys.
- Press [D] to invoke a standard alphabetic search on the
non-blank fields OR [Alt] + [E] to invoke an extended
inclusive search.
- If only one matching document is found, the software will
automatically invoke the viewing window and display the first page
of the document set. The control focus will switch to the viewer
and the keyboard will control the viewing software. Use
[Alt] + [Tab] to switch back to the Viewing
Module.
NOTE: Do not close the
viewer. When the next document set is retrieved, the images will be
displayed immediately.
- If more than one document set matches the search criteria, the
Search Results list will display qualifying document sets.
Use the [Up Arrow] and [Down Arrow] keys to move the
selection bar to the desired document set and press the
[Enter] key to view that particular document. Use
[Alt] + [Tab] to switch back to the Viewing
Module. The cursor will be positioned in the same location in
the Search Results list and you can repeat this step to view
other qualifying documents.
The Search Results list can be sorted by any
combination of index fields. In addition, the initial sort order
can be defined in the configuration for each database. The [Default
Sort Order] for documents displayed in the Search
Results list can be set in the configuration module.
If no Default Sort Order is configured, then
the documents will be displayed in the order they were saved in
vMedia, starting with the oldest entry. This behavior maintains
compatibility with previous versions of vMedia. The Search
Results list sort order can also be changed in the Viewing
Module for the current session.
How To Set the Sort Order:
-
Start vMedia, select the desired database, and
select [Viewing Module].
-
Construct a search by specifying one or more
conditions and/or fill-in the desired data entry fields.
-
Select [Database Search] or [Extended
Database Search] to query the database.
-
Once the Search Results list appears, select
[Sort].
-
Fields which are participating in the sort order
are listed in the Sort Results on: section in the order of
key importance.
-
Fields may be removed from the sort order with the
mouse by clicking on the desired field and then clicking on
[Remove] or by simply double clicking on the desired
field.
-
The key importance may be changed with the mouse by
clicking and dragging the gray square to the left of the field name
to the appropriate position in the list.
-
Fields which are not participating in the sort
order are listed in the Available Fields: section.
-
Fields may be added to the sort order with the
mouse by clicking on the desired field and then clicking on
[Add] or by simply double clicking on the desired field.
-
The new sort order takes effect when [OK] is
selected. Pressing [Cancel] will discard any changes made to
the sort order and the Search Results list order will revert
to the last order that was in use.
-
Key Importance - The sort order is defined
starting with the field listed as Primary and then moves to
the fields listed as Sub #1, Sub #2 and so forth for all documents
matching a parent set of keys. Any documents matching all the
specified keys will be displayed in the order that they were
entered in the database. If no fields are listed in the Sort
Results on: section, then the sort order will be exclusively
the order the documents were entered into the database.
-
Column-based Sorting - Simple sorting can
now be accomplished by clicking on the column header.
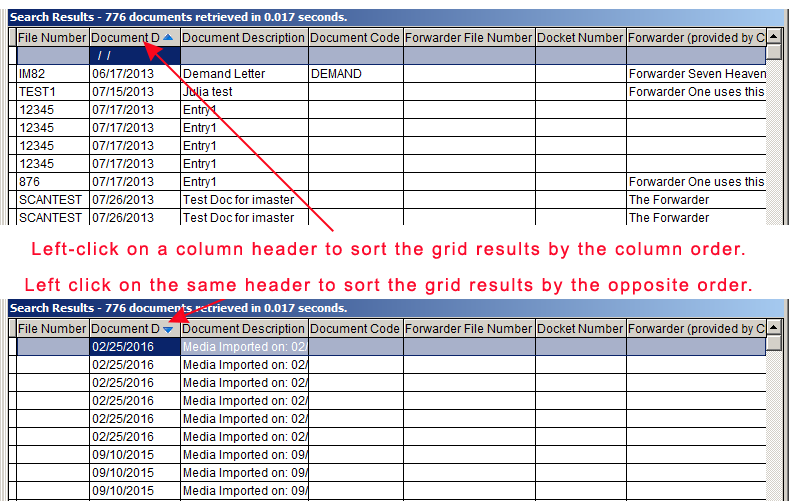
NOTEOTE: Both
the existing sort functionality and the new sort functionality
operate on the base search results. However, sorting by grid column
headings, and using the [Sort] button are mutually
exclusive. Whichever method is used last, takes precedence.
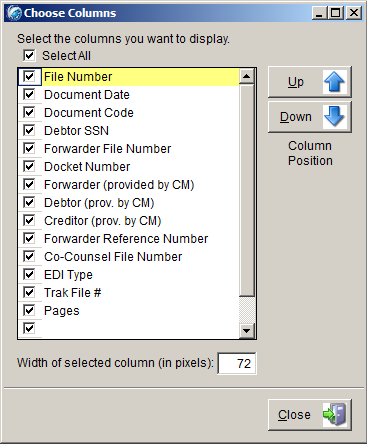
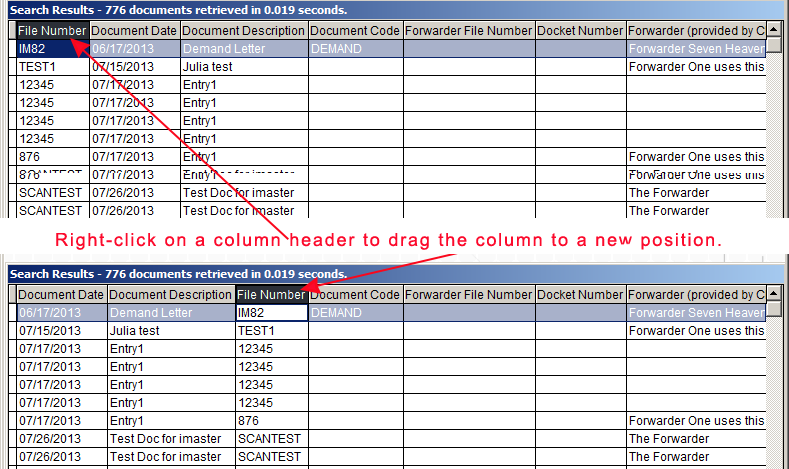
- Right-click on a specific column header to open the Search
and Filter Control for the selected column.
- The Search and Filter Control shows the available
headers related to your original search.
Uncheck any header that you want to eliminate from the
results grid.
NOTE: A
column that is removed from the search results in this manner
remains hidden for subsequent searches until restored, or when the
Viewing Module is exited. Once the Viewing Module is exited, all
column visibilities are reset to the configuration established for
the database.
Place a
checkmark next to a header for any column that should appear in
the search results grid.

NOTE: Changes made to the column positions and column
widths will be automatically saved under the logged in user's
profile and will be restored and used in future searches by the
user.
- Resize Column Width
- Resize column width by clicking on the dividing line that
separates each column and dragging the line to the left or to the
right.
NOTE: If you click
[More...] (see previous graphic), an
interface appears that allows you to edit the column positions or
you can edit the selected column width.
- Reposition and Resize Column Width
- Highlight the desired column and click the [Up] or
[Down] buttons to move the position of the column.
- The column at the top of the list will appear on the far left
of the grid and the the column at the bottom of the list will
appear at the far right of the grid. In essence, the order of the
list coincides with the column order.
- Resize column width by selecting the desired column and then
entering the [Width of selected column (in pixels):].
Click [Close] to save and exit.
Related Topic
Viewing Module
Introduction
Search and
Filtering of vMedia Results Grid
|